
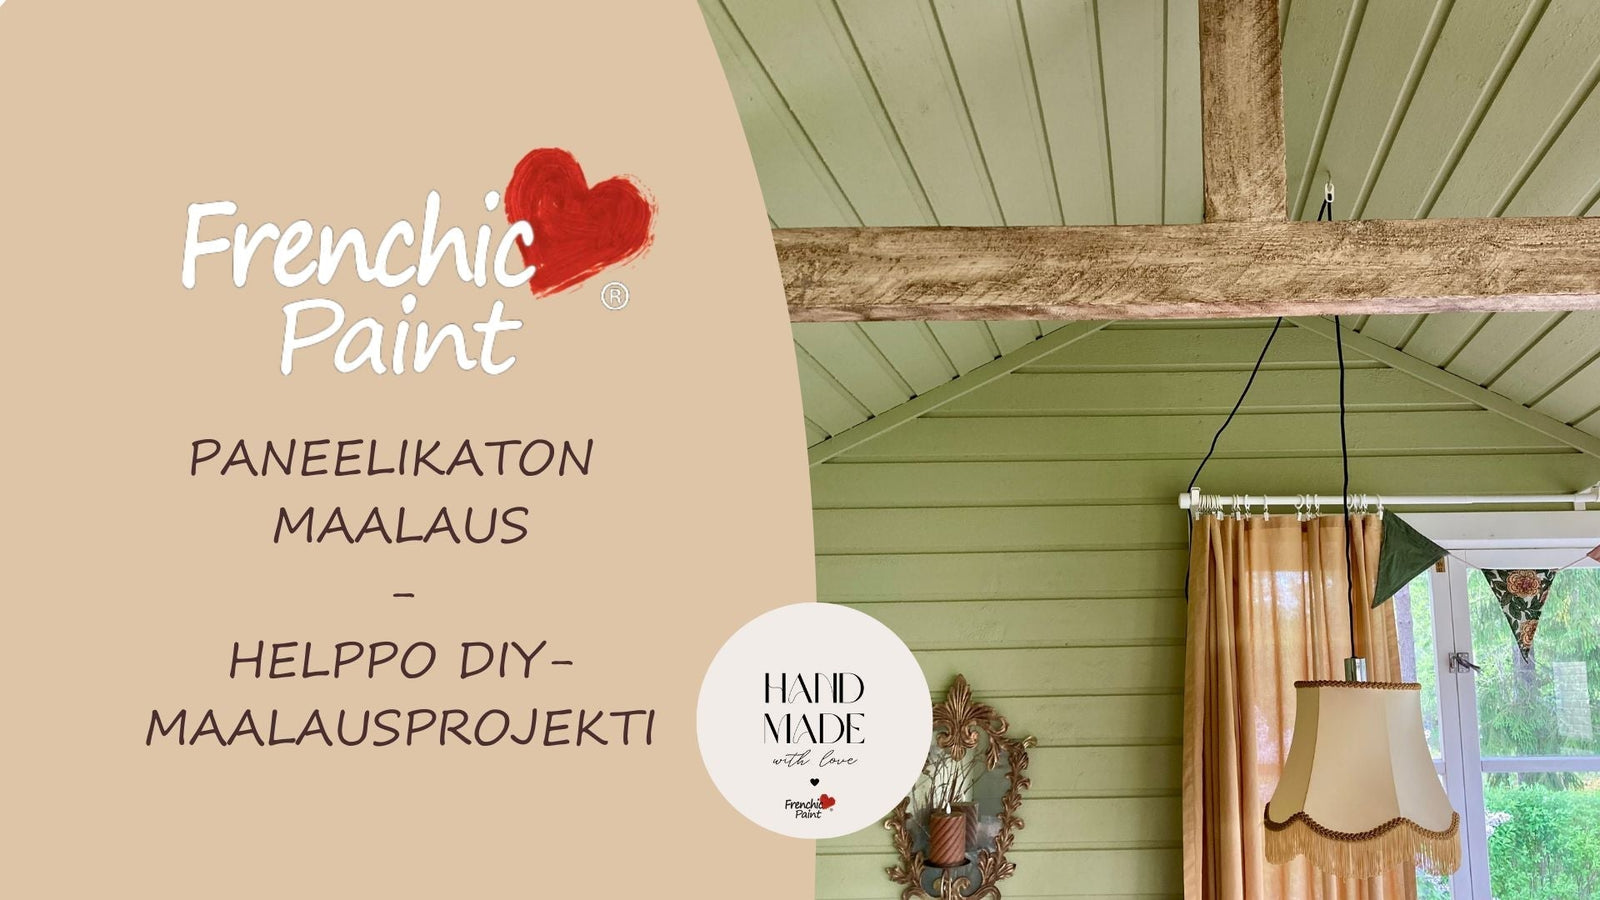

Paneltakets nya liv – Ett enkelt DIY-målningsprojekt!
Kan man tänka på taket som en femte vägg? Nu målas tak med samma färg som väggarna – eller åtminstone väljer de modigaste något annat än målarvit!
På bilden valdes den ljusgröna Apple Barn som färg för paneltaket, väggfärg.

När du funderar på att måla paneltak, ta hänsyn till dessa saker innan du börjar
Val av Frenchic-serie
Du kan välja färg från vilken Frenchic-serie som helst eftersom det gäller en inomhusyta.
Ditt val kan styras av dessa faktorer:
- Hur mycket är det att måla?
- Vill du välja någon vacker specifik färg?
- Vill du ha en heltäckande nyans eller vill du att träådringen ska synas lite?
Om det är mycket att måla kan en stor 2,5 liters förpackning vara ett ekonomiskt alternativ. Om det däremot är ungefär som ett litet rum, till exempel ett litet kök, barnrum eller wc, kan du också välja en nyans från andra serier som är förpackad i 750 ml.
Späd ut färgen och låt träådringen synas
Om du vill låta träådringen synas lite kan du måla billigare än vanligt: du kan späda ut den nyans du valt. En bra utspädningsgrad måste testas för just ditt paneltak, men ofta ligger den någonstans mellan 20-40%.
Tips! En riktigt vacker nyans fås av utspädd ljus beige, till exempel Cool Beans eller Salt of The Earth-nyanserna.
Frenchic-serierna har olika färger per serie. Utforska vårt färgsortiment här.
Färgval
Välj modigt och ge rummet en helt ny atmosfär!
Till barnrum passar himmelsblå, ljusa rosa eller lugnande beige bra. I små utrymmen som toalett kan du kanske våga mer – mörka nyanser skapar en intim atmosfär och ett personligt resultat. I köket kan vardagen förtjusas av ett vackert tak i färgen bärgröt eller soligt gult!
Till färgen på paneltaket i bilden valdes samma som på kakel, gröna Steaming Green.

Täckförmåga
Generellt kan man säga att panelytor med alla sina ådringar naturligtvis kräver mer färg än släta ytor.
Om du målar ny och obehandlad panel påverkar det också förbrukningen, eftersom den nya träytan absorberar färg in i träytan under de första lagren.
Om du målar gammal, orangegulnad och kvistig furu- eller granpanel vit eller ljus, där det finns mörka kvistfläckar, avgör den mörkaste fläcken hur många lager som måste målas för att täcka kvistarna. Mörka färgnyanser kräver färre lager än vita eller ljusa.
Tips! När du målar ett mörkt, gulnat och kvistigt paneltak vitt, är det bra att måla första lagret grått – ett lager räcker för att bryta den orange tonen och du behöver färre vita lager. Du kan välja grått från Al Fresco-serien, till exempel City Slicker eller Swanky Pants nyansen.
2,5 liters behållare, Väggfärgens täckförmåga: cirka 36 m2
750 ml behållarstorlek. Möbelmålningsseriens täckförmåga: cirka 13,5 m2

Gör ditt tak till hemmets finaste detalj genom att följa dessa tydliga instruktioner:
1: Förberedelse är nyckeln till framgång!
- Rengör takpanelerna noggrant från damm och fett, särskilt sot- och köksfett. Använd effektivt Sugar Soap rengöringsmedel för fettborttagning.
- Skydda golv och möbler med plast eller tyg
- Se till att arbeta säkert, använd stadiga stegar och föredra förlängningsskaft.
- Använd skyddsglasögon och skyddskläder under målningsarbetet. Keps skyddar håret.
- Säkerställ god ventilation under arbetet
- Läs mer om skydd här.
2: Förarbetet gör skillnad!
- Kontrollera om panelerna behöver grundfärg – så får du en hållbar och vacker yta.
- Slipa lätt om ytan är blank, lackad eller ojämn från tidigare målning
3: Målningsglädje!
- Välj en högkvalitativ färg och måla panelerna först med en pensel vid skarvarna. XL-stor oval pensel är perfekt för målning av paneltak och panelväggar.
- Rör om färgen noggrant före start och under projektets gång
- Använd en roller för att uppnå ett jämnt slutresultat.
- Låt färgen torka ordentligt mellan lagren.
4: Njut av slutresultatet!
Beundra det fantastiska, ljusa och fräscha slutresultatet!

Målningsinstruktioner och inspiration: